Just sharing this month's
Pages 2 Scrap DT projects using the beautiful
BasicGrey Aspen Frost collection.
This collection is festive but subtle, and really versatile for lots of
different styles of layouts. I really like the 'Tin Solider' vintage style ornament
paper and the wax seals, but my new fave is the velvet rub-ons. I LOVED using
these, I think they are my new favourite product! I liked them so much
that I even used the negative flocked bits that you would normally throw
away. They take a bit more rubbing than regular rub-ons but the texture they add to your layouts is fantastic.
For
my first layout I used a Heidi Swapp mask and copper GlimmerMist on
some plain red cardstock to give it a bit of sparkle, then added some
blooms and embellishments from my kit and a doily and a few simple flowers from my
stash. I love these colours together - aqua and red - they work so well
for any layout, not just for Christmas. Check out my dad's beard. Awesome.
This 'Cherried Noses' paper is one of those that you have to buy two of because both
sides are so pretty, but for this doggy layout I've gone with the music side and roughed it up with a bit of stamping.
You can see the flocked red sheet behind the photos - this is the
leftover negative part after I used all the rub-ons.
The flourish is
from WoW with the addition of some copper embossing
powder. And there's a bit of red Kaiser bling in there too, vintage lace and Tattered Angels Mistables printed crepe paper under the photos. How cute are our pups? Cody wearing the ho ho ho antlers was our kelpie cross (sadly gone for two years now), Molly is my sis-in-law's staffie, also in antlers, and Rennie is my other sis-in-law's very old and wrinkly miniature pinscher. They all enjoy Christmas with their humans. :)
Do
you have a 'nice shelf' at Christmas? A special place you put all your
breakable things up away from the kids? All the pretty things that you buy thinking your house is going to look like the one in the magazine, only to realise it looks like a shit storm in a daycare with all the festive kiddy craft around the place?!
However, I can control this one little spot, where I can put my pretty stuff, and the nostalgic and necessary (but butt-ugly) stuff is confined to the other parts of the house.
I thought this would make for some good journaling, and I kept this layout simple with the flocked
rub-ons taking centre stage. I wouldn't have picked grass green and aqua
as colours that would work together but the different tones of red
really bring them together and makes this collection Christmassy without
being too full-on.
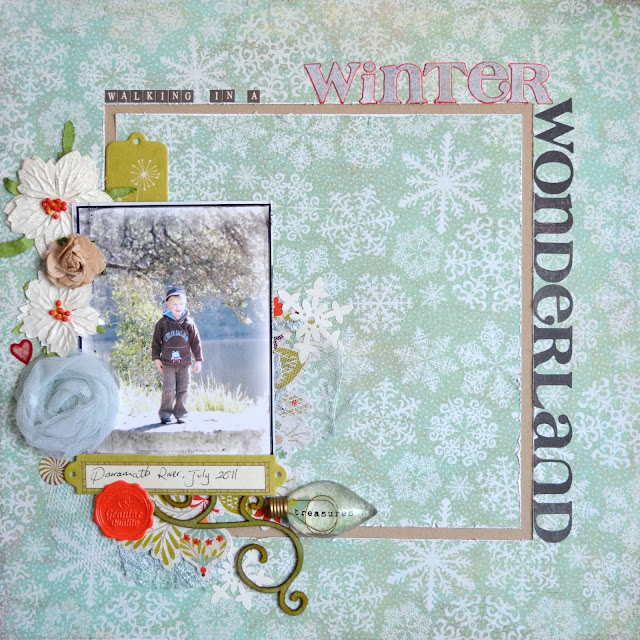
This
'Covered Lashes' paper was really sweet to work with too, there was
some lovely white Christmas flowers and Aspen Frost cardstock stickers
in my kit which I've used under and around the photo, the lightbulb is
from Prima and I made the blue netting flower using Glubers glue
circles. Do you like my frosted photo effect? I've just discovered
PicMonkey and it's awesome, so easy to use and you can get some great effects without stuffing around with Photoshop. I'm a graphic designer so I'm no stranger to Photoshop, but PicMonkey is just so much quicker and easier!
The vinyl faux-wax seals from the Aspen Frost collection are really sweet too! These would be a lovely addition to your extra special Christmas cards. You know, the ones you only make for your mum and your best friend because you know everyone else throws them out after Christmas is over. ;)
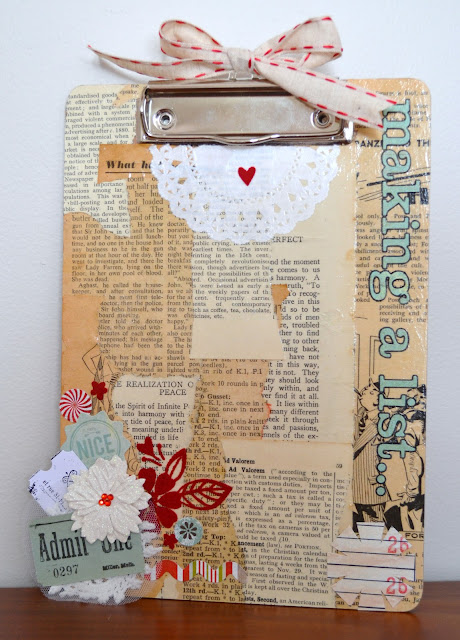
Last up, I've been planning to
alter this clipboard for a while now after I did
a similar one for my good friend Karyn. I've decoupaged with vintage paper and embellished with Aspen Frost
embellies and alphas, and that gorgeous red stitched ribbon from Pages 2
Scrap. I think I could nearly get away with using this year round... I've been looking for a spot to store all my monthly receipts.
It's really putting me in a festive mood doing
all these great Christmas projects. Are you making handmade gifts or
cards this year? What a great excuse to pop in to Pages 2 Scrap and do some SHOPPING! (As if we need an excuse!).


.JPG)

